Wednesday, March 31, 2010

Sour on the Sourdough Bread, but Sweet for the Sour Cream Coffee Cake!


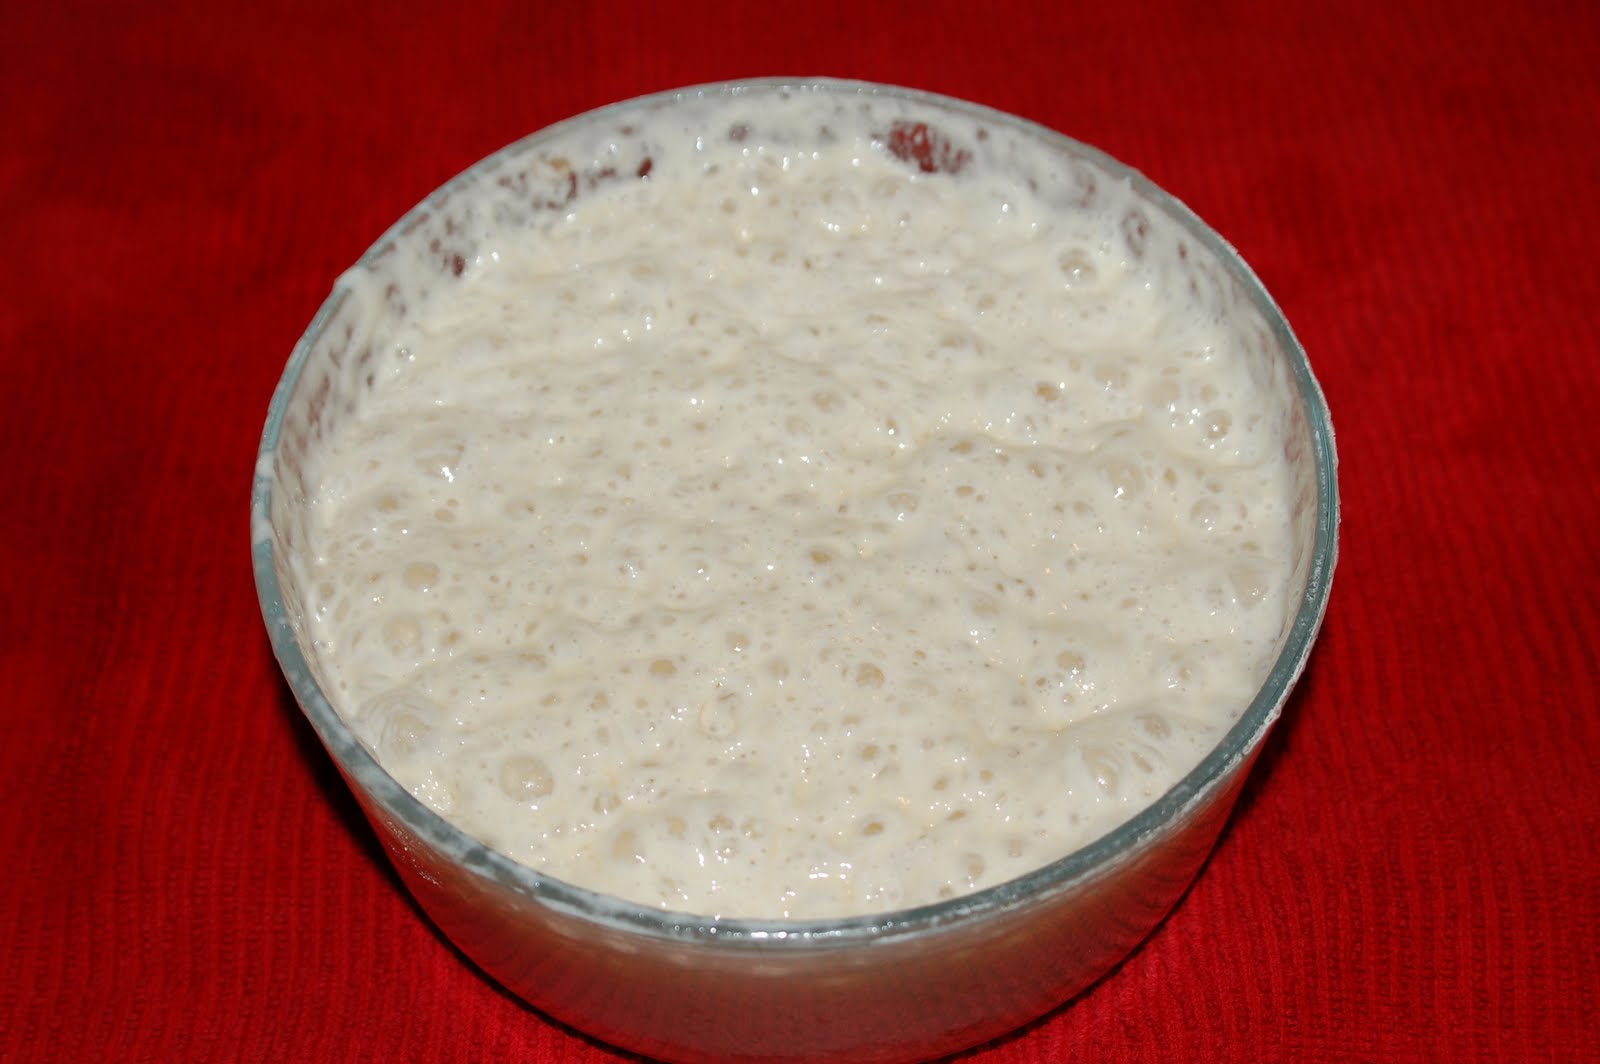
My attempt at Sourdough Bread (which I discussed in an earlier entry) was not as successful as my other breads.  My starter had developed after feeding it for two days, so I followed the recipe in CIA's Baking at Home, adding a cup of the starter to the prescribed amounts of water, yeast, flour and salt.  The dough was very sticky, so I kept adding a bit more flour.  It never felt right to me, but since I've never made this before, I thought perhaps this was the consistency of this particular dough.  So I shaped it into a round and left it to proof. It didn't rise very much--even after 2-3 hours.  I was just about to toss it in the trash when I remembered something Peter Reinhart said; how you can't go wrong with fresh baked bread even when it doesn't turn out the way you want.  So I put it in the oven and let it bake.  After the suggested time of 30 minutes, it was still pale, and though the internal temperature was 200 degrees, I put it back in for another 10 -15 minutes until golden.  After cooling, the loaf felt dense and heavy and tasted doughy.  I left it overnight, cut a slice in the morning, but still was not happy with the texture, and though I thought it might work well toasted, I tossed it in the trash!  This weekend I will begin again--only this time I'm using Reinhart's San Francisco Sourdough Bread recipe on page 64 of his Artisan Breads Every Day.  I've had such good luck with his recipes.  I don't know why I didn't use his to begin with!

  
Now on the same day I made my favorite coffee cake.  Sour Cream Coffee Cake is a variation of a Betty Crocker Baking Basics recipe that includes a brown sugar and nut filling and a glaze topping.  This time I used chopped pecans instead of walnuts and it was delicious. So my baking day was not an entire waste!
                                        
Sour Cream Coffee Cake

Preheat oven to 350F.  Spray angel food or tube cake pan with cooking spray.  (I use a bundt cake pan)

Brown Sugar Filling (Prepare and set aside)
  • 1 cup brown sugar, 1 cup finely chopped walnuts or pecans, 3 teaspoons ground cinnamon, well-mixed.

Coffee Cake
  • 3 cups all-purpose flour, 1 1/2  tsp baking powder, 1 1/2 tsp baking soda, 3/4 tsp salt.  Well-mixed in in large bowl, set aside.
  • 1 1/2 cups of sour cream (can use light sour cream, if desired)  set aside.
  • In stand mixer, beat on medium speed:  1 1/2 cups of sugar, 3/4 cup butter (1 1/2 sticks, room temperature) 1 1/2 tsp vanilla, 3 large eggs.
  • On lower speed, beat in 1/2 of flour mixture and then 1/2 of sour cream; repeat until mixed well.
  • Spread 1/3 of batter on bottom of pan; sprinkle 1/3 of filling. Repeat twice.
  • Bake 350 degrees about 1 hour--until toothpick comes out clean.
  • Cool about 10 minutes before removing from pan.  Cool another 10 -15 minutes.
Glaze
  • 1 cup powdered sugar, 1/2 tsp vanilla, 6 T milk.  Mix thoroughly and then drizzle over cake.                                 

"Serious Fun"--an Oxymoron, or My Apron Arrived!

I discovered today that I am, and always will be, an English teacher, for when my new apron arrived in the mail, two words came to mind, serious and fun, and I immediately thought, oxymoron!  Let me explain. An oxymoron is a literary term meaning a self-contradictory combination of words, such as bittersweet, or jumbo shrimp, or holy war.  (Actually I just discovered that the word itself is an oxymoron, from Greek meaning sharp-dull.)  Have I lost you yet?  Are you falling asleep?  Then let me get to the photo!
Yes, I ordered an apron with Baking Daze in LA embroidered in yellow on red.  To me this apron means I am serious about my baking venture and committed to this blog, yet having so much fun!  The two words go together perfectly.

Monday, March 29, 2010

Stay-tuned for Sourdough Bread!


I started my first starter!  I'm using the CIA's recipe--Culinary Institute of America that is--which uses an organic potato.  1 cup of bread flour, 1 cup of water, 1/2 cup of grated raw organic potato to start. I fed it after 24 hours with another cup of flour and a cup of water, then again 12 hours later.

 Now I repeat this every 12 hours for a total of 3 feedings.  Then it's ready to use.  Can't wait to try it this week!

Sunday, March 28, 2010

There's Something about Baking Bread

        
I think this has now become a part of my weekly routine.  As soon as one loaf disappears, I am antsy to make another.  This time I weighed my dough--10-12 ounces each--before I formed my batards and worked them into baguette form.  I used Peter Reinhart's recipe for Classic French Bread  ( Artisan Breads Every Day page 49).    I let the crust get nice and dark and crispy.  So good!                                                                                                                                                              

And Once in Awhile...Treat Yourself! Decadent Chocolate Peanut Butter Cupcakes!

Most of the time I am a very healthy eater, especially being vegetarian: whole grains, beans, fruits and vegetables.  But every now and then I get a craving to go all out, and these cupcakes are at the top of my list.  The souffle-like chocolate cupcake is Clemence Gossett's recipe from Gourmandise Desserts: http:www.gourmandisedesserts.com  I say souffle-like because they are as moist as a souffle. Today I added peanut butter filling and used a chocolate ganache as icing because I'm not a fan of buttercream frosting.  But you can also use the chocolate ganache as filling instead and ice with whatever topping you like.

Recipe for the Chocolate Decadence Cupcakes:
      (This made about 18 cupcakes for me, so double if you need more.)  Pre-heat oven 350.
1. Place 2 sticks butter, 2 cups of water and a pinch of salt in a bowl--microwave on high for 1 minute.  Remove and stir until butter is melted. Whisk in 1/2 cup cocoa powder (I use Valrhona cocoa powder) and set aside.
2.  In a large bowl, whisk together 1 3/4 cups of flour, 2 cups of sugar, and 1 tsp of baking soda.
3.  Using a wooden spoon, add the butter mixture to the flour mixture and stir until just incorporated.
4.  Whisk in 2 eggs until combined.  Add 1/4 cup sour cream (or creme fraiche, or yogurt) until no streaks remain.  Do not over-mix.
5. Pour into cupcake paper-lined pan.  Fill almost to the top.  They only rise a little.
6.  Bake at 350 degrees for 20 minutes--until toothpick in center comes out clean.

Recipe for Chocolate Ganache:  Can use as filling and / or icing.
1.  Place 2 cups of chocolate chips in medium-sized bowl.  (I used Ghirardelli bitter sweet chips)
2.  In a small saucepan, bring 1 1/2 cups of heavy cream to a simmer.  Stir frequently to prevent burning.
3.  Pour the cream over the chocolate chips, wait 30 seconds, and then whisk gently until all of the chocolate has melted.  The color will deepen into a nice dark, creamy chocolate brown.

Recipe for Peanut Butter Filling:
1.  In medium bowl, beat 1 cup of creamy peanut butter and 3 tablespoons of butter until creamy.  (I used my electric hand-mixer.)
2.  Slowly add about 2/3 cup of confectioners' sugar; beat until light and fluffy.

To fill cupcake after it's cooled: Spoon peanut butter filling into a pastry bag with a 1/4 inch star tip.  Plunge the tip into the center of the cooled cupcake, not quite to the bottom. Squeeze gently and withdraw slowly.  Wipe away any off the top.

Coat top of filled cupcake with chocolate ganache.  Decorate iced cupcake with remaining peanut butter filling.

These cupcakes are small but mighty!  They have a dense, moist texture and a creamy chocolate and peanut butter consistency.  You definitely need a glass of cold milk or a cup of coffee with these babies!

Friday, March 26, 2010

Time to Get Healthy: Reinhart's Everyday Whole Wheat Sandwich Bread


This week I decided to try Peter Reinhart's Whole Wheat Sandwich Bread, though I did substitute about 5 ounces of oatmeal flakes to the remaining 23 ounces of whole wheat flour.  (Full recipe: Artisan Breads Every Day page 83).  I used my stand mixer to combine ingredients, then did the stretch and fold by hand as instructed, and finally put it in the frig for a slow fermentation.     


You can let it ferment up to 4 or 5 days, but I was impatient and took it out the next evening.  The dough had risen to the top of the container by then. 
                                     
The recipe said to divide dough for two loaf pans and let them proof until risen just beyond the top of the pan.   Mine ended up making it to the top, but not beyond--perhaps I should have waited longer than three hours.
                                    
I garnished the top with an egg wash (egg white and water) and sprinkled oatmeal flakes, sunflower seeds, and sesame seeds.  Then in the oven at 350 degrees for 40-50 minutes with a 180 degree rotation in the middle. 


They didn't rise as high as I expected, so next time I'll let them rise a bit longer in the pan before baking or put more dough in one loaf pan and make a free standing loaf with the rest.  (My pans may be bigger--9 inch--as opposed to 8 inch). But the real test was the taste!  And they were --wonderful! 

Monday, March 22, 2010

Most Requested Cookies!

There are two different cookies that I make regularly: Scharffen Berger Chocolate Chunk Oatmeal Cookies for my husband Bruce and Coconut Oatmeal Cookies for my son and daughter, Dean and Claire. 

Bruce loves my Oatmeal cookies so much that I make the dough, keep it refrigerated, and then bake 6-9 fresh cookies every couple of days until it's time to make a new batch. I used to make them with just chopped walnuts until my daughter gave me a gift of Scharffen Berger baking chunks (fine artisan dark chocolate) and I decided to add a few to each oatmeal cookie.  They were better than any chocolate chip cookie I've ever tasted.  Now I almost always include them; in fact I order  my supply of chocolate baking chunks via the internet since I can't find them locally.

Dean and Claire's favorites are Coconut Oatmeal cookies.  Whenever they come to visit, I bake enough to send home with both of  them. 

            Scharffen Berger Chocolate Chunk Oatmeal Cookies
  
For the most part, I follow the recipe for oatmeal cookies found under the Quaker Oats lid, but I omit raisins and add chocolate chunks and chopped walnuts instead.

1 ½ cups of all-purpose flour
1 teaspoon baking soda
1 teaspoon cinnamon
½ teaspoon salt

½ pound (2 sticks) butter or margarine, softened      
1 cup firmly packed brown sugar         
 ½ cup granulated sugar
2 eggs                                                       
1 teaspoon vanilla

3 cups Quaker Oats (old- fashioned, uncooked)
1 ½ cups chopped walnuts
*Scharffen Berger baking chunks

  • Heat oven to 350°
  • Mix flour, baking soda, cinnamon, and salt and set aside. (flour mixture)
  • In stand mixer on low-medium, mix butter and sugars until creamy. Add eggs and vanilla, mix well.
  • Add flour mixture. Mix until combined.
  • Add oats, then walnuts until combined.
  • Drop rounded tablespoonfuls onto ungreased cookie sheet. I press *three chocolate baking chunks   onto the tops of each unbaked cookie at this point.
  • Bake 10-12 minutes @ 350 ° until golden brown. Do not over-bake.
  • Cool 1 minute on cookie sheet; then remove to wire rack.
I also use this recipe without chocolate for a less sweet, but still very delicious, Oatmeal cookie.


Coconut Oatmeal Cookies


Sift together flour mixture:                         Cream:
1 cup all-purpose flour                       ½ cup butter or margarine
½ teaspoon baking powder               ½ cup sugar
½ teaspoon salt                                ½ cup brown sugar
½ teaspoon baking soda                  1 egg
1 teaspoon vanilla
                             ½ cup old fashion oats uncooked
                                   1 cup flaked coconut

  • Heat oven to 350°
  • Sift flour mixture; set aside
  • Cream butter, sugars, egg and vanilla. Add flour mixture until combined.
  • Add oats and flaked coconut.
  • Drop rounded tablespoonfuls onto ungreased cookie sheet. Sprinkle top of each with pinch of coconut flakes.
  • Bake 10-12 minutes @ 350 ° until golden brown. Do not over-bake.
  • Cool 1 minute on cookie sheet; then remove to wire rack.

Friday, March 19, 2010

Presentation is Almost as Important as the Actual Product, or Another Excuse to Shop at Williams Sonoma!

I saw this adorable and subtly pretty cake dish at Williams Sonoma and just had to get it to display my cakes and cupcakes and pies and cookies!  It has little bees along the edge, and the yellow is mellow and pleasing to the eye.  Plus it doesn't detract from where the eye should focus, which was proven as my coffee cake quickly disappeared!

My Artisan Bread

I've made Peter Reinhart's Pain a l'Ancienne Rustic Bread twice in the form of mini baguettes and they actually looked exactly like the photo in his book. I was so proud--but didn't think to mark the moment with my own photograph!  The real test was when my mother-in-law Yolande, who is French, tasted it and said it was wonderful--just like fresh bread from France!

This week I used his slightly different recipe for Lean Bread and found the dough easier to work with--less sticky.  I tried my hand at forming a baguette but the result was more like a batard.  I think I could have made 2 or 3 baguettes with the same amount of dough, so next time that's exactly what I will do. 


Also I used my new baking stone and added water to a pan below to create steam and thus come close to hearth baking.


There is nothing like the aroma of fresh baked bread--and it tasted wonderful.

Wednesday, March 17, 2010

Peter Reinhart: Master of Artisan Breads

http://peterreinhart.typepad.com/     http://letsgetcookin.com/


What serendipity to discover that Peter Reinhart was speaking and demonstrating at Let's Get Cooking in Westlake Village just as I began this new chapter in my life!  I have two of his books, The Bread Baker's Apprentice and Artisan Breads Every Day.  His breads are "easy" in that you can make the dough one day, put it in the frig, and bake 1-4 days later.  I love the fact that he continues to perfect his process of slow-fermentation, making minor changes from book to book that he says improve the flavor. 

Let's Get Cooking is an adorable store that sells everything culinary that you can imagine.  In the back of the store is their kitchen--also the site of Westlake Culinary Institute.  Their set up includes a long tables along the work counter so students can observe and take notes.  On this occasion, rows of chairs were placed behind these tables allowing for a fairly good size audience.  In addition, they used a camera and TV screens so the audience could see exactly what he was doing.

It was a delightful evening--like a live taping of a Food Network show.  The day before they had prepared a multi-purpose lean dough and an all-purpose sweet dough so they could ferment overnight and be ready for him to demonstrate and bake for us.  This way he was able to show us both how to make the dough from scratch and also what to do on baking day.  In just a couple of hours he created--and we sampled--his signature artisan lean bread, challah, cinnamon buns and sticky buns (with varied toppings), coffee crumb squares, fruit filled thumbprint rolls, and yes, Chocolate Cinnamon Babka.  He also demonstrated how to create different shapes from baguettes to epis, how to braid, and how to use bannetons.  He was scientific--explaining the chemistry of bread baking.  He was spiritual--speaking of bread as transformational.  And he was sweet--kindly signing my book: "To Debbie, May your crust be crisp and your bread always rise!  Best Wishes, Peter Reinhart."

Tuesday, March 16, 2010

Clemence Gossett : Gourmandise Desserts

http://www.gourmandisedesserts.com/

My next class was with the perky and cute Clemence, whose passion for all things baking is matched by her eclectic range of knowledge.  Just check out her website and you'll see what I mean.  Many of her classes are held at the kitchen classroom of Surfas Restaurant Supply in Culver City , which gives you an opportunity (and 10% discount) to pick up specialty ingredients or supplies.   It's a culinary Toys R Us!  You can order on-line as well:  http://www.culinarydistrict.com/

My first class with her was Scones and Muffins.  Her class is a combination of demonstration and hands-on as each recipe is prepared.  Then we're sent home with the recipes (and a box filled with our delicious baked goods!) and encouraged to call or email her as questions arise when we repeat them on our own.  (She answered my email one morning within an hour!)  Using her recipes and tips, I have since made apricot/aniseed scones, chocolate chip/walnut scones, and blueberry muffins.  Her recipes are so good that I have retyped them in larger print and added them to my baking notebook.  I plan to include them in my blog as I bake and photograph in weeks to come!

My second class two weeks later was Gourmet Cupcakes.  I came away with recipes for the most moist Chocolate Decadence cake and chocolate ganache filling (and topping as far as I'm concerned) and my husband's favorite--a recipe for marshmellows.  (I added peppermint extract to the marshmellows when I made them the next day--and my husband ordered a weekly supply!)

Clemence's classes are much less expensive than other "recreational" classes, and she gives excellent advice and tips for the more serious baker.  I've been considering taking a professional series of classes and am researching local schools, but I think I could learn just as much, and for less, with Clemence.  I just love her!

Monday, March 15, 2010

Chef Eric's Culinary Classroom: Bread Made Easy

http://www.culinaryclassroom.com/ 

My first venture beyond my own kitchen was a Breads Made Easy class at Chef Eric's Culinary Classroom in West Los Angeles.  As with most cooking schools, his offers both a professional culinary series and a professinal baking series for the more serious minded, as well as basic cooking workshops and recreational one day classes.  My daughter took the Culinary Basics class with Chef Eric and said he was wonderful.

My Breads Made Easy class was taught by Chef Teresa. It was a three hour class that included some lecture and lots of hands on.  First she demonstrated a number of breads, some with yeast, some without, before leading us into the kitchen where we teamed up, chose two different recipes, and got to work. 


I claimed  the focaccia table, and with my partner, who was happier just watching for the most part, started on our yeast dough, let it proof.  Then began our quicker Irish Soda Bread. To my focaccia, I added sun-dried tomatoes and fresh herbs (rosemary and oregano) and to the Irish Soda  Bread, apricots and aniseeds. 

 We were also encouraged to watch and help others--so I got to practice forming brioche and rolling baguettes. Of course, at the end of class we got to sample everything: Delicious!
                                                                                                                                                                                                  

Apologies and Explanations about All Things Red

I hope my color choices aren't too hard on the eyes, but I absolutely love the color red--with a pinch  of yellow for spice.  Red is the dominant color in my kitchen: Kitchen Aid stand mixer, toaster, rice cooker,  dishes, dish towels, apron, canisters, utensil holders (you name it, it's probably red) with a flash of yellow here and there: tea pot, dish towel, sunflower vase.  And so it seemed appropriate that my baking blog should feature these colors as well.  My apologies--but I love it!