Tuesday, April 27, 2010

Cake Crumbs: Specialty Cake Class


What a wonderful two day class with John and Susan Rota at their specialty cake shop Cake Crumbs in Encino.  The class was called Introduction to Baking I, but I feel like I learned much more than the basics as you will see.

The first day we began by mixing and baking a luscious three layer white cake which was so moist it could be eaten on its own.  We then made a light, creamy vanilla buttercream filling that was just the right level of sweetness. Now let me stop here and say I am not a big cake eater and often scrape off the frosting.  I don't like anything that is too sweet.  This cake and buttercream, however, were in a class of their own.  I would highly recommend them and only hope I can recreate them on my own at home.

Unlike many other cake creators, John makes his own fondant, which is easy to work with and tastes great.  He also insists on taking the time to create a fondant-lined cake board edged in ribbon that adds a clean, elegant look on which to display his cakes--much nicer than the typical foil boards.

We ended the first day by cutting out tiny flowers of fondant, which we would use the next day to decorate our cakes, and assembling our three layers of cake with the buttercream, which we covered in plastic wrap and put in the refrigerator.

Day two involved decorating.  First we worked on the flowers:
Next we covered the cake with the fondant, which is an art in itself, but John is an excellent and meticulous teacher. 
                                      
 Then we gave the cake a base coat of paint.

Of course there are myriad ways to decorate a cake, but John suggested a unique design inspired by the work of artist Keith Haring. It involves a filigree piping in a maze-like design which was difficult to imitate at first but a blast once I got the hang of it.

Then we piped tiny balls all along the bottom of cake.
    
and last attached our flowers.
When I stepped back to look at it, I was amazed.  I still can't believe I made this stunning cake.

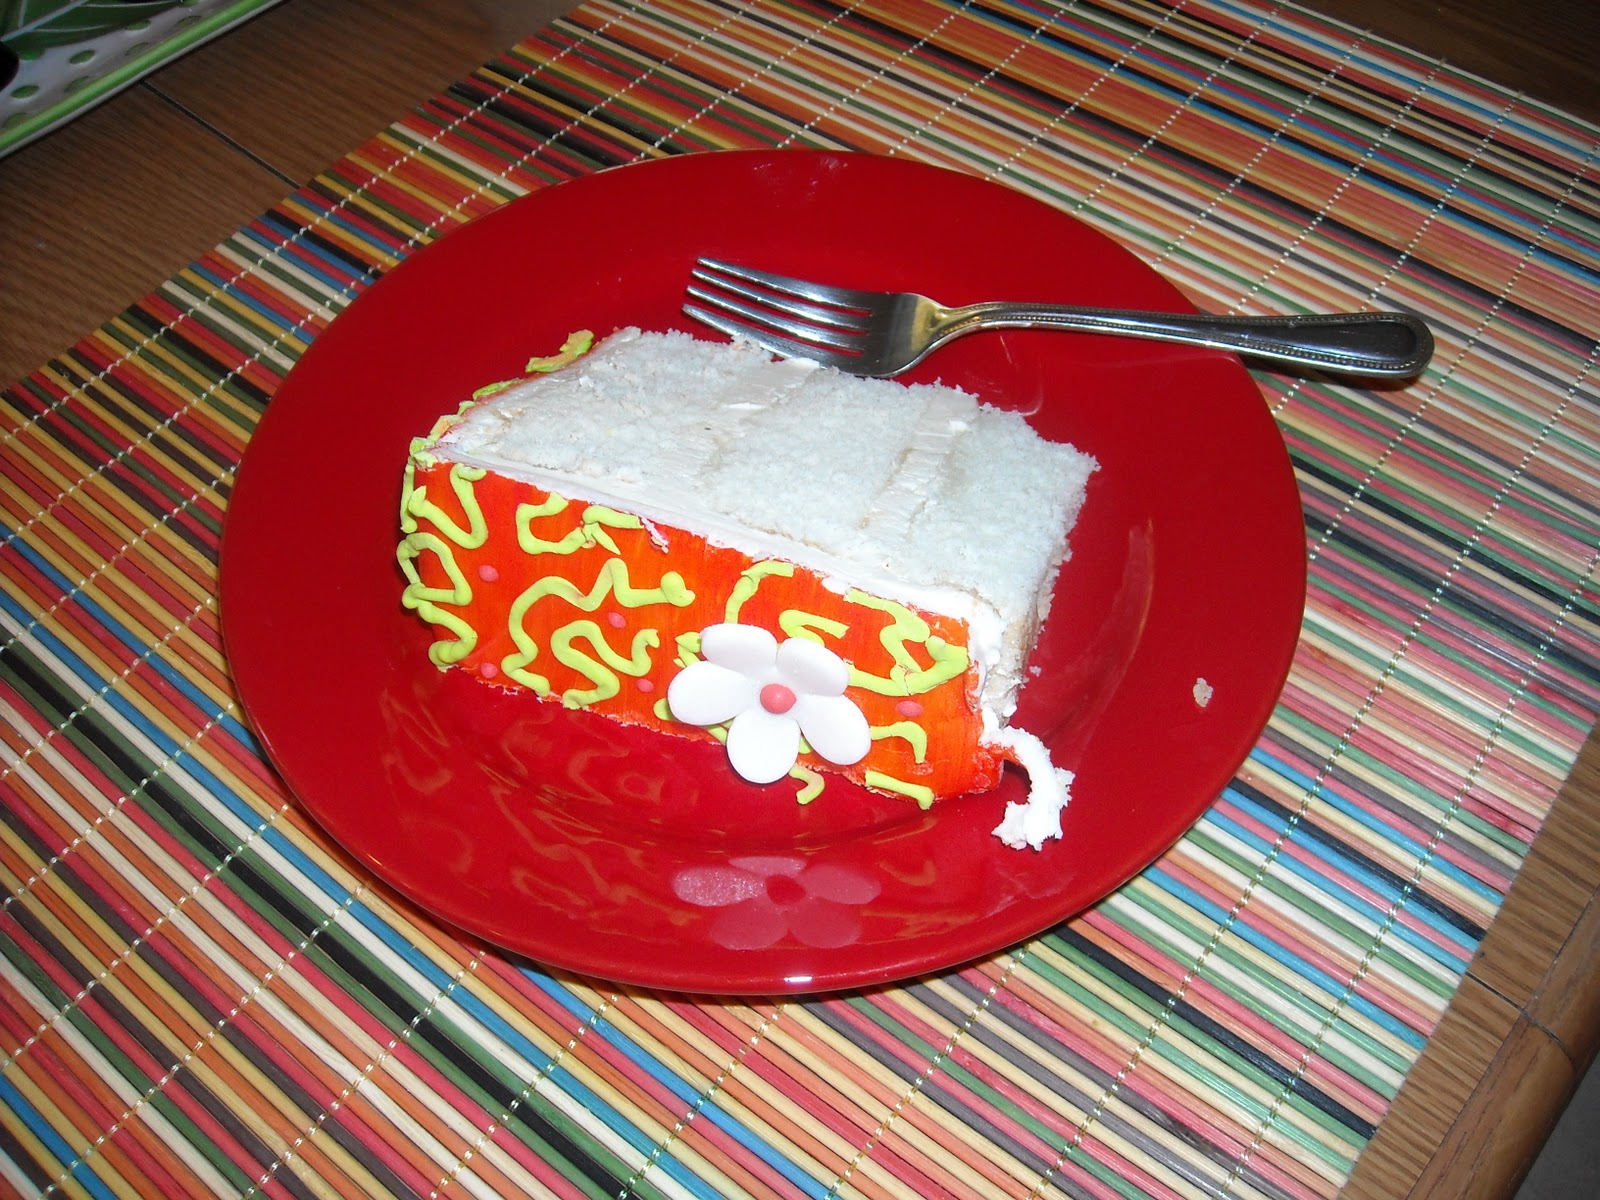
I managed to get it home intact.  It sliced easily--and oh my, tasted great. My husband loved it--especially the fondant. He said the same thing I did--It was not at all overpowering with sweetness, but just right, and the fondant had a chewy texture like candy.

I would encourage anyone interested to check out their website http://cakecrumbs.com and take a look at their classes.  It is definitely worth the cost to work with these highly skilled artists. I plan to continue my training in cake design with John and Susan.  As teachers they are generous, patient, and very knowledgeable.  As artists, they are talented and inspiring.  It is clear that they love what they do and it shows in their work.

Friday, April 23, 2010

Pies and Tarts, or Another "Green Tomato" Incident!


This week in my Professional Baking class at The New School of Cooking the subject was pies and tarts.  Carol's recipe produced a light flakey crust that was delicious.  We used all butter with just a tablespoon of sugar to soften the starchiness of the flour. 

Pie Crust:   Combine 2 1/2 cups all purpose (AP) flour, 1/2 teaspoon of salt, 1 Tablespoon of sugar, 8 ounces of cold butter, and 6-8 Tablespoons of ice water.  I worked it with the tips of my fingers--like playing a piano, not squeezing--until it felt like wet sand with pea-sized pieces.  Then formed it into a ball.  

The secret is not to over-mix.  Pie dough should look like marble--not smooth. I loosely double wrapped the ball in plastic wrap and then pressed it flat about the size of a large pancake and put it in the refrigerator.  It should stay at least one hour, but is still good for up to 3 days. Or you can freeze it for a couple of months and then defrost in the fridge before rolling.  This recipe makes a double crust (top and bottom).  

I also learned that when you roll out your dough, it is a one shot deal!  If it cracks and tears, don't double roll.  Just piece it together like a puzzle and press. It will smooth out as it bakes. 

We made Apple Pie: Mix together 6 cups peeled and sliced apples, 1/2 cup sugar (brown or white or mixed),  1/1/2 Tablespoons of flour, 1/2 teaspoon cinnamon, dash of salt, and then fill pie crust forming a nice rounded mound.  Cut 3 Tablespoons of butter into bits and tuck and dot around filling.  Cover with top crust, seal and flute. Cut steam holes.  Brush top with cream and sprinkle with sugar.  Bake 350 degrees 40-50 minutes or more till done.
                                                 
Next we made a Lemon Tart. The tart dough is slightly different: 2 1/2 cups AP flour, pinch of salt, 1/2 cup sugar, 8 ounces butter, slightly soft and diced, 1 egg, 1/2 teaspoon vanilla.  Combine flour, salt and sugar.  Cut in butter.  Combine egg and vanilla and add to flour-butter mixture.  Mix with hands to form a nice smooth dough.  Blind bake: Place dough in tart form: special pan with pop out bottom, place parchment over the crust, fill with dried beans as weights, cut parchment leaving a couple of inches of parchment beyond edge of pan.  Bake 350 degrees filled 10 minutes, Remove parchment and weights and bake another 10 minutes.  Fill with lemon curd and bake another 5- 10 minutes.   

Lemon Curd: Combine 4 whole eggs, 4 egg yolks, 1 cup sugar, zest from 2 lemons, 3/4 cup lemon juice in a stainless steel bowl over a pot of boiling water (bain marie).  Add 8 ounces of diced butter and cook, whisking occasionally until thick. Strain into tart shell.  Bake as described above.

Now for the Green Tomato Incident!
Many years ago, when my daughter Claire was about three years old, I planted my first vegetable garden which included about 6 tomato plants.  I was so excited when I saw them sprouting little green balls--and so, you may have guessed, was Claire.  I vividly remember her bouncing into the kitchen proudly displaying two pails full of little green balls!  I was devastated--and have never forgotten it.  

Well...a similar thing happened to me this morning.  Yesterday I brought home my apple pie which I was looking forward to showing off..and enjoying of course.  My husband and I each had a small piece at dinner.
                                      

Well, when I woke up this morning and walked into the kitchen, this is what I saw!!!!!!!!!!!!
All I could think of was Claire and the little green balls.  Now it was Bruce and an empty pie dish!  After apologizing, he said I should be flattered: it was irresistibly good.  Plus he left enough for me to get this photo as evidence.  How could I be mad at either one of them?

Wednesday, April 21, 2010

Something About Bread

Creme Brulee, Souffles, Eclairs and Cream Puffs may look enticing and taste so delicious, but there's something about bread that I prefer.  Even my mother-in-law, who has become my most faithful taste-tester, says she enjoys the fresh baked breads the most.  Thanks Yolande!

I love everything about bread baking beginning with the simplicity of the basic ingredients: flour, water, salt, and yeast.  Nothing fancy.  Nothing extravagant.  Nothing that is hard to pronounce or difficult to find.  While Peter Reinhart speaks of bread as transformational, alluding to its spiritual symbolism found in diverse religions, for me it's plain and simple.  I love the entire process.  Scooping and weighing.  Mixing and kneading. Shaping and proofing. Baking--smelling--and eating.

Since nothing worthwhile in life comes easily, I also love the time and effort required.  Bread baking demands patience and the willingness to plan your own precious time around the process. There's a seriousness and commitment that can't be denied.  Without it, the process fails.   For instance, if I don't feed my mother starter every five days, I have to start all over again.  I love the fact that in my refrigerator right now, waiting for me, are a container of mother starter--good until Sunday--and a container of sourdough starter-- made yesterday from a bit of the mother starter and ready to be added to more flour, water, salt and yeast to become 3 or 4 sourdough baguettes.  
My next venture is to attempt Acme's Rustic Baguette from Maggie Glezer's book Artisan Baking.  These are Glezer's favorite baguettes from the Acme Bread Company established in Berkeley, California in 1983.  This recipe is considered to be at an intermediate level because it involves two separate pre-ferments.  Now how exciting is that?  I'm ready!

It Just Keeps Getting Better: Chocolate Souffles and Cream Puffs!

This was last week's class and I haven't had a chance to write about it.  But again both the souffle and the pastries were easier than I anticipated.  The souffle base can be prepared ahead of time and refrigerated.  When ready to bake, bring to room temperature and fold in the whipped egg whites, bake and serve immediately.  We dropped a chocolate ganache ball in the center before baking and, oh, what a luscious taste and texture!  Haven't tried them at home yet.  As for the pastries, they began with pate a choux which is the pastry dough that puffs a bit leaving room to pipe the pastry cream inside.  We topped some with a chocolate gananche and the others with a glossy cocoa glaze. 

This week is pie week!  Stay tuned!

Wednesday, April 14, 2010

Sourdough Success!

My previous attempt at making sourdough bread failed miserably.  So I was pleased that this week and a half's careful, meticulous, scientific approach to bread baking was a success!  This time I followed Peter Reinhart's recipe for sourdough starter. (Once again: Artisan Breads Every Day--my bible for bread baking.) It includes pineapple juice which he says kills a bacteria (leuconostoc) that can sabotage your starter--and it produces a mixture that smells pretty good in the beginning too!

First: The Seed Culture
The seed culture takes about 6 days: Day 1 begins with a combination of flour (I used whole wheat) and pineapple juice which sits at room temperature for 48 hours.  Day 3 adds more flour and pineapple juice and another 24-48 hours at room temp.  Day 5 now adds flour and filtered water to the culture at room temp.  And Day 6 the same.  At this point the seed culture is ready to become the Mother Starter.

The Mother Starter:
Day 7 a combination of seed culture, flour and water are combined and kneaded, placed in an oiled bowl, covered and left to double in size.  This is the Mother Starter. It is ready to use or refrigerate and is good for 5 days.  Some of it can be used to make bread immediately.  The rest is refreshed periodically and kept in the refrigerator for future use.


I then followed his recipe for San Francisco Sourdough Bread which produced a nice workable dough.  This one took another two days because it involves a wild yeast starter ( part mother starter, part bread flour, and water) that needs to sit for a day before use. They shaped and baked nicely.
                                          
And they had a wonderful taste and texture!   I will definitely be baking these often.

Crème Brûlée! is Easier Than Pie!

 I have to admit that I was a bit worried about over-cooking the eggs in the custard, setting up the bain marie, and working with the chef's torch, but all of it turned out just fine.  In fact, I can't tell you how easy it is to prepare this lovely dessert. (Actual recipe--see previous entry.)

I began by putting the eggs and sugar in a bowl and heating the cream in a pan until it bubbled on the edges and moved a just bit in the center.  Then I slowly tempered the heated cream into the egg mixture, a small amount at a time, adding 1 tsp vanilla extract to the combined mixture (since I didn't have vanilla beans).   I strained the custard into another bowl, poured it into ramekins, and placed them on a half sheet lined with a towel.


I carefully put them in the oven and then poured hot water into the tray, filling it until it reached about 1/3 up the sides of the bowls. 
                   
I baked them about 25 minutes until they shook evenly when I tapped the side.  Then I cooled them on a rack for 30 minutes and covered each with plastic wrap and placed them in the frig.         
It's best to let them set for at least 6 hours before bruleeing and serving, but they can keep for up to 3 days. So as pointed out before, you can make them ahead of time and simply torch and serve when needed!
                                               
The next evening, I sprinkled a layer of sugar on each, smoothing it evenly across, lit the torch, and carefully bruleed back and forth until a nice layer of caramelized sugar formed.  They were wonderful!

Sunday, April 11, 2010

Crème Brûlée!

This week at New School of Cooking we focused on custards and puddings.  My favorite was Crème Brûlée.  As fancy as it looks, it's actually very easy to make.  I even stopped at Surfas to pick up some ramekins and a chef's torch so I can practice this week and add them to my repertoire of desserts. Here's the recipe:
4 egg yolks
4 T sugar 
1/2 vanilla bean
2 cups heavy cream
sugar for caramelized topping

1. Combine egg yolks with sugar in a bowl--set aside.
2. Split vanilla bean down the center lengthwise, scrape out seeds
3. Add both pod and seeds to the 2 cups of cream in a pan.
4. Heat cream until bubbles on edges and movement in center--do not boil.
5. Slowly temper in hot cream mixture to egg mixture, small amount at a time, or eggs will cook!  Use wooden spoon to stir constantly.
6.  Let steep for 10 minutes with vanilla bean.
7.  Preheat oven to 300 degrees. Coat 4-6 ramekins lightly with cooking spray.
8. Set them on a kitchen towel in a deep baking pan. This will create a water bath or bain-marie which prevents egg-rich dishes from overcooking.
9.  Strain custard (toss bean) and pour into ramekins almost to top.
10.  Place pan on middle rack of oven.  Carefully pour hot water into the pan so that it comes about 1/3 of the way up sides of the dishes.
11. Bake 300 degrees  20 -25 minutes.  Do not overcook. Tap side gently--should shake evenly. (CIA says: done when edges have set and a nickel-sized spot in center jiggles slightly.)
12. Remove dishes from bath and set on wire rack to cool for 30 minutes.  Wrap individually and refrigerate for at least 3 hours and up to 3 days before finishing with brûlée layer.
13. When ready to serve: evenly coat the top of each custard with a thin layer of fine sugar-- about a tablespoon.  Use chef's torch to evenly melt and caramelize the sugar. (Move torch constantly, back and forth, until sugar browns.) Serve immediately. 

What I love about this impressive dessert is that you can make it a day or two ahead of time, refrigerate until ready to serve, and then dramatically torch in front of your guests and voila--Crème Brûlée!


Saturday, April 10, 2010

Blueberry Streusel Muffins


The streusel topping makes this a one of a kind blueberry muffin. I like using these parchment cups instead of cupcake papers because they open easily and make clean-up neat and simple.  This recipe makes 6 muffins. Double for a dozen. Pre-heat oven 350 degrees.

Topping:   Can be made in advance and stored in frig for up to one week.
                 1/3 cup brown sugar
                 1/2 tsp cinnamon
                 2 T chilled butter
                 1/2 cup chopped walnuts
                 Mix all ingredients together with fingertips to resemble 
                 coarse crumbs. (Don't cream)  Set aside or store in frig.

Muffin Batter:

  •  Mix together dry ingredients> 1 1/2 cups flour, 1/2 tsp baking soda, 1 tsp baking powder,1/2 tsp salt.
  •  Combine wet ingredients> 2/3 cup brown sugar, 1/3 cup vegetable oil, 1 egg, 1/2 cup buttermilk, 1 tsp vanilla.
  • Carefully fold together wet and dry ingredients using a rubber spatula.  Do not over-mix. 
  • Gently fold in 1 cup fresh blueberries.
  • Spoon batter in lined muffin pan and top each with streusel topping.
  • Bake 20-25 minutes or until toothpick comes out clean.
Can prepare each part ahead of time: (*but do not combine wet and dry until ready to bake!)    
  • Prepare topping, cover, and put in frig.  
  • Wash berries, cover and put in frig.
  • Mix wet ingredients, cover and refrigerate. (Bring to room temp before mixing with dry.)  
  • Mix dry ingredients.  Cover and set aside.  
So they can be prepped the night before and ready to mix the next morning for warm muffins for breakfast.
*Must bake as soon as you combine wet and dry because baking powder and soda activate when combined with liquid.

Recipe from Carol Cotner Thompson, New School of Cooking


My All-time Favorite Scone Recipe


These scones are light and lovely--melt in your mouth yummy.  I added currants and orange zest to these. Recipe compliments of Carol Cotner Thompson of the New School of Cooking.
1.  Combine:
                1 ½ cup flour  
                1/3  cup sugar 
                 ½  tsp salt 
                 3 tsp baking powder 
                 Add zest of 2 oranges (or lemon)    
2.  Cut 3 ounces (6 T) chilled butter into dry ingredients: Carefully use your fingers to combine butter and dry ingredients to form wet sand—do not cream together.
3.   Add 1/3 cup chopped walnuts or dried fruit or currants  
4.    Lightly beat together ½ cup cream and 1 egg yolk and gently add to above mixture.  Use fork and then hands to work dough gently—do not over mix!—and form into a ball.
5.    Press down to 1 inch thick, no less.  Cut into desired shapes. (circles, triangles, squares).
6.    Wash with cream and sprinkle with sugar.   
7.   Place on parchment lined tray, sprayed lightly with cooking spray.
8.   Bake 350° for about 20 minutes, until golden brown.


Monday, April 5, 2010

Did My "Homework": Muffins, Scones, and Carrot Cake! (Plus Started Another Sourdough Starter)

Yep, I've been busy doing my homework.  As I pointed out in a previous entry about my Professional Baking class at New School of Cooking, my assignment this week was to make Blueberry Muffins with Streusel Topping, Currant Scones, and Carrot Cake at home on my own.  So this morning I got started beginning with the muffins.  (All recipes will be included as soon as I check with school to be sure it's okay.)  I made the streusel topping first, then the muffin batter, filled the parchment cups with batter and topped them.  Put them in the oven to bake, and moved on to the scones.  Once the muffins came out, the scones went in, and I started on the carrot cake.

Confession: I don't know what I was thinking, but I put in shredded carrots (the long, skinny, pre-packaged kind), not grated carrots like the recipe called for, and I didn't realize it until I was mixing the wet with the dry ingredients.  At this point I figured I'd bake it and see.  If it didn't work, I'd toss it, and if it did--well, maybe I'd discover my own twist on a more carroty carrot cake.
The verdict?  My taste testers both said they liked it very much.  One said he didn't see a difference and the other preferred the slightly more carrot crunch.  It did taste very good, so I'm glad I didn't toss it.  Will I do it again?  Not sure.  I'll probably try the grated next and compare.

                                         
I was so happy with both the muffins and the scones, they are now my all-time favorite recipes.  

I also began a new starter for sourdough bread using Peter Reinhart's recipe that includes pineapple juice.  I will write in more detail once it's finished (in a week) and I attempt a loaf of sourdough bread.

Love My Baguette Pan


Ordered my little baguette pan on-line at cooking.com, and I've used it twice already.  It holds the dough during both proofing and baking. (After shaping the dough into a baguette, gently place it on the pan, cover it loosely with plastic wrap, and let it proof.  Then when ready to bake, simply pop the pan in the oven.)  You can buy pans that hold 2, 3 or 4 baguettes.  It works beautifully.

Friday, April 2, 2010

Professional Baking at the New School of Cooking

After much research into local schools offering serious classes on baking, I decided on the Professional Baking series at the New School of Cooking in Culver City.  It's a ten week class that meets once a week for four hours and covers all aspects of baking from basic quick breads to souffles, pies, and cakes to artisan breads and pastries. The instructor, Carol Cotner Thompson, is a graduate of both the cooking and pastry programs at the California Culinary Academy and has been teaching for over 20 years.  Like many other local culinary schools, the classes at New School include some lecture and demonstration followed by hand-ons in the kitchen, but unlike other schools that pair up students in the kitchen, New School students work on their own in the baking program--a fact that I liked.

My first class met last week and I was thrilled with all aspects--the physical set-up, the instructor, fellow students, and the class itself.  (I even got my own white chef's jacket!)  Compared to a few other schools I've seen, New School is spacious and open and arranged in a way the makes it easy for ten students to get what they need without much bumping of elbows or spilling of flour.  They cleverly set-up the work tables in one direction for the beginning lecture/demonstration, and then turn them the other when students are ready to work. The instructor Carol was great--professional, personable, knowledgeable, and very helpful.  There are ten students in the class--all women--and most are considering taking their baking to a professional level.

Our first class was on quick breads which served as an intro to baking basics and gave us a chance to get used to the kitchen.  Carol demonstrated blueberry muffins, scones, and carrot cake.  She wove in valuable tips as she moved through each recipe.  (Mix brown sugar with wet ingredients, not dry.  Put cold eggs in a bowl of hot water for five minutes to bring to room temperature.  Do not over-mix muffins or scones--just until combined so they will be light and airy, not heavy and dense.)  Then we got to work.

We each made blueberry muffins with streusel topping and then currant scones, and when finished, we sampled Carol's to see what  they should taste like and then compared them to our own. (I did pretty well, though her scones were so light they melted in my mouth.)  Our homework is to bake them again on our own at home.  And of course, we got to take our "classwork" home to eat!


Thursday, April 1, 2010

Simple and Delicious.


Since I had left-over Chocolate Ganache from my cupcakes last week, I put it to good use.  It hardens in the frig, so I popped it in the microwave for a minute or two until it softened enough to stir easily.  Then I dipped fresh organic strawberries into the melted chocolate and placed them on a dish to sit a minute.  We ate a few with the chocolate still soft and warm--mmm--and put the rest in the frig to harden and be enjoyed later.
(Chocolate Ganache: 2 cups of good quality chocolate chips in medium bowl; 1 1/2 cups of heavy cream in saucepan to a simmer--pour over choc. chips, wait 30 seconds, stir until melted and blended.)