Monday, June 28, 2010

Orange Zesty Zucchini Bread


There is nothing I love more than my morning coffee--except perhaps waking up and remembering that I baked something that goes great with that morning coffee.  While I enjoyed my lemon muffins last week, yesterday I baked a zucchini bread that had me hopping out of bed early this morning.  What makes it especially tasty are the spices: cinnamon, nutmeg, & cloves and the orange zest. I added two heaping tablespoons of zest but next time I think I'll add three. The freshly grated zucchini adds moisture and the walnuts (sorry Sean!) add crunch. I made two loaves and froze one, but the first loaf is going so fast, I probably didn't need to freeze number two after all!  Again, quick and easy recipe.  Smells good while preparing and baking, and tastes as good as it smells. 

Dry ingredients:
3 1/2 cups of all purpose flour
2 tsp baking powder
1/2 tsp baking soda
1 tsp salt
1 tsp ground cinnamon
1/2 tsp nutmeg (ground or freshly grated if possible)
1/4 tsp ground cloves

Wet ingredients:
 2 1/2 cups grated unpeeled zucchini (drain liquid a bit if too wet)
1 cup of sugar
4 large eggs, lightly beaten
1/2 cup vegetable oil
2-3 Tbsp grated orange zest

1 cup coarsely chopped toasted walnuts or pecans

(Makes 2 loaves--8 1/2 inch loaf pans.)

Preheat oven to 350 and grease and flour pans.

1. Combine dry ingredients in a bowl and set aside.  (You can sift or use a whisk to distribute and mix well.)

2. In a large bowl, mix wet ingredients by hand until evenly blended.

3. Add dry ingredients to wet mixture and stir until evenly incorporated--but don't over-mix.

4.  Fold in the nuts. (I also place walnut halves on top of the bread, partly to please my husband who likes extra of everything and also to alert anyone who might be allergic to walnuts, like my step-son Sean.)

5. Pour into prepared pans and bake at 350 degrees for 45-50 minutes until done.  Edges will be golden and pull away from sides.  Toothpick comes out clean.

6.  Cool in pan a few minutes then remove from pan and cool on racks.
 
Enjoy!
Basic recipe from:


Thursday, June 24, 2010

Lemon Zesty Vanilla-Yogurt Muffins


If you're in the mood for something sweet but not too sweet, then these are perfect.  I got this recipe from my Williams Sonoma Baking Book that my son Dean got me for Mother's Day, but I tweaked it a bit to fit my taste. The muffins are moist, delicious, and lemon zesty!  It's quick and easy.  (I used organic products when I could find them.)

(Yep, you may notice a new countertop!  We had the kitchen done in just a few hours by Granite Transformation http://granitetransformation.com/  It's a granite overlay that goes right over the existing counter--in our case tile--and is done without demolition or disruption.  They come out to measure and make a template one day and install the next week. They were literally in and out in 4 hours. I love it!  Now I can roll fondant and knead bread dough on a smooth, cool surface.)

Lemon Vanilla-Yogurt Muffins
2 cups all purpose flour
1/2 cup sugar
1 1/4 tsp baking powder
1 tsp baking soda
1/4 tsp salt
grated zest and juice of one lemon
1 1/4 cups vanilla yogurt
2 large eggs, lightly beaten
5 T unsalted butter, melted

Topping;
1/2 cup chopped walnuts or pecans
2 T sugar
1/2 tsp mace (or 1/4 tsp nutmeg) or 1/2 tsp cinnamon
(whatever spice you prefer--I might try anise seed sometime as well)

Preheat oven to 375 degrees and grease muffin tins with baking spray or line with paper cups.

In a bowl stir together the flour, sugar, baking powder and soda, salt and lemon zest. 

Make a well in the center and add the yogurt, eggs, melted butter, lemon juice, and mix with a whisk until thoroughly combined.  The batter will be a bit lumpy.  That's it!  Quick and easy!

Now spoon into muffin cup almost to the top.  Mix topping ingredients together and sprinkle each muffin generously or lightly, depending on your preference.

Bake 15-20 minutes, until golden and toothpick comes out clean.  Enjoy!                                                                                                                                                                                                                                                    
 

Wednesday, June 16, 2010

Little by Little....

                                  
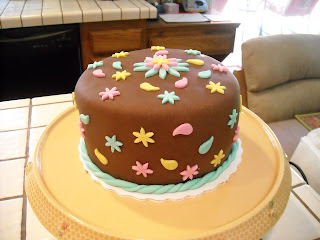
My cake skills are improving--though I still have so much to learn.  I baked my third cake this week and also made some teal-colored fondant.  It's all becoming easier and so much fun!  Mistakes I made in the past, I'm careful not to repeat, and those that I'm encountering for the first time, I'm learning from.

This time my cake baked beautifully; it was easy to handle, yet still moist and tasty.
I used chocolate ganache filling between layers, but dammed it with too much buttercream on the edges.  Next time I'll know to cut a smaller hole in the pastry bag and use less.  The layers slid around a bit, but solidified once refrigerated.
After assembling the three layers, I crumb-coated the cake with buttercream and placed it in the fridge overnight.

I decided to use the rest of my chocolate fondant (from my previous cake) as the cover and decorate with pastel designs.  This time my fondant rolled out evenly and I covered my cake with ease. It went on smoothly without tears or bumps. 

Now for the fun! I decided on small daisy-like flowers and also paisley shapes that I made with a tiny leaf cutter. Initially I had a few butterflies on the cake as well but decided it looked better (cleaner) without them. 

On my list to learn next: How to make life-like flowers with gum-paste, how to make tiered cakes, how to use texture sheets, impression mats, stencils, lace molds, quilters, and crimpers, how to model figures, and much, much more!


Homemade Pizza

Finally I've found a recipe for homemade pizza that works for me.  I used San Marzano whole peeled tomatoes, garlic, mozzarella and parmesan cheese, and fresh herbs from my garden: parsley, basil, and rosemary. 

Pizza Dough
1 cup warm water
2 1/4 t active dry yeast
2 1/2 cups of all purpose flour (plus more as needed)
2 T olive oil
1/2 t salt

Combine warm water and yeast, then add to 1 1/2 cups of flour in a large bowl.  Mix well. Add the oil, salt and remaining cup of flour.  When dough-like, turn it out on a lightly floured surface and knead until smooth. Add flour as needed so it is not too sticky--but don't overdo the flour. Knead about 4- 5minutes.  This can be done in a stand mixer as well--but I love the feel of it!  Place in a lightly oiled bowl and cover with plastic wrap.  Let it rest on the counter until doubled in size--about 1-1 1/2 hours.

When doubled, divide in two for medium sized pizzas or into (4) smaller parts for individual sized pizzas.  Roll into balls, cover with loose plastic or a towel and let rest for about 20 minutes.

At this point (1 1/2 - 2 hours since started), you can shape the dough into circles using your hands and or a rolling pin.  Be sure the edges are a bit thicker than the center.

Add toppings as described below, then bake at 400 on sheet pan or 500 on baking stone until done.  (Or you can refrigerate for up to 2 hours, let sit at room temperature for 1 hour, before baking.  Or you can freeze the dough, later defrost in the refrigerator, then bring to room temperature 1 hour before shaping and baking.)


Topping
1-2 cans San Marzana whole ripe tomatoes--deseeded and chopped
2 cloves of garlic thinly sliced (not chopped)
Olive oil
fresh basil chopped (and any other herbs to taste--optional)
mozzarella--sliced circles or shredded
parmesan cheese--preferably fresh grated
salt

Heat dry pan, add oil and garlic--cook until garlic sizzles in center, then turn off heat.
Add tomatoes, basil, other herbs, salt.  Mix and set aside.

When ready: spoon sauce lightly on pizza dough almost to edge. Add cheeses, drizzle with a bit more olive oil, add salt to taste.  Don't load on the toppings or crust will be soggy.  Less is more!


Friday, June 11, 2010

Sunflower Cupcakes

There are so many things I want to bake, I don't know where to begin.  I'm antsy to get back to cake decorating, especially since I've gotten hooked on Ace of Cakes and Cake Boss!  Plan to get my hands on some fondant again very soon. 

I did make an apple pie for my pie monster using the beautiful red pie dish that Claire got me for Mother's Day.

But then I saw Dede Wilson's cupcake book and just had to learn how to make the sunflower design.  Her entire book is fabulous.  I particularly like the way it's organized.  It begins with Master Recipes for all types of cupcakes (white, yellow, chocolate, carrot cake, pound cake, crumb cake, even brownie cupcakes), as well as various frostings, icings, glazes--even a poured fondant glaze.  Then these recipes are followed by 60 different creatively designed  cupcakes, each with a picture, recipe, tips, and advice on how to create the design. She gives step by step instructions that are easy to follow. Check it out.


The sunflower was easier than I expected. I used chocolate ganache in the center using the grass tip to get the squiggly effect where she used chocolate sprinkles, and I used tip #352--a petal tip--to make the petals.  I'm not experienced decorating with tips and buttercream at all, but I followed her simple directions and it worked!  The cupcakes are chocolate (her recipe) and the icing is Italian Meringue Buttercream (Cake Crumbs recipe).
I also played around with her Wacky Faces cupcakes--that's me, Bruce, and Chloe in the middle of course.
And since I love black and white cookies, I had to make a couple of her Black and White cupcakes--with Bruce's favorite chocolate ganache only jumbo cupcakes.


 Okay, I got that out of my system.  Now it's time to get serious about cake decorating.

Sunday, June 6, 2010

It's That Time of Year: I Graduated!


Thursday was my last Pro Baking class at The New School of Cooking .  I will miss my weekly trip out to Culver City--though not the drive in rush hour traffic on the 101/405 freeways!  Carol Cotner Thompson, our instructer, was fabulous. I would recommend the school to anyone interested in learning more about cooking or baking.  There are both professional and recreational level classes.  I enjoyed every aspect of my class.  The mutual love of baking and the controlled chaos in the kitchen always made for an exciting Thursday morning, not to mention the yummy baked goods I took home every week. 

For me the class ended where it had actually begun--with chocolate croissants.  I remember watching Meryl Streep bake them for Steve Martin in the  movie It's Complicated and thinking, I want to learn how to do that.  In fact, when I started looking for classes, that was one of my criteria: Will they teach me about croissants?  So it was only appropriate that on my last day we made them. Chocolate croissants, regular crescent-shaped croissants, and delicious apple turnovers. Actually the turnovers were the biggest hit with all of my tasters--even for me!  
                                    

So now it's time to take what I've learned and practice until I perfect each one.  I'll be posting photos and recipes with tips about what technique works best or what ingredients can be tweaked.  Not sure where to begin--cakes, cupcakes, pies, artisan breads, muffins, creme brulee, souffles, cookies, croissants, apple turnovers...any suggestions?